
Git - Overview and Typical Workflow
What is Git, where did it come from and what can you do with it


Previous Articles in VCS Series
Overview
This article in the VCS series will kick-off the series of articles on one of the most popular version control systems : git.
This article, in particular, will focus on the basic aspects of git (for more details on VCS basics, go here). We will briefly touch upon
why git was made in the first place
what does it mean for git to be a distributed version control system
and finally we will cover a black box view of how git is used by developers in their daily work.
A brief history of git
Git was developed in 2005 by the same team that developed and maintained linux kernel. In particular, Linus Torvalds was one of the key contributors towards the creation of git. One of the main reasons for Linus and the team for creating git was to work as a replacement of another distributed VCS system called BitKeeper which was being used to power version control for the linux source code.
The creators of Git had the following goals in mind while creating their new VCS Software
Speed
Simple design
Strong support for non-linear development (thousands of parallel branches)
Fully distributed
Able to handle large projects like the Linux kernel efficiently (speed and data size)
What does it mean that Git is distributed?
If you have been following along with the SVN Articles, you know that in case of SVN, the central repository is the source of truth for your files and you are required to check-in your changes to this central repository for them to be available for others to use. While this is creates a simple model that allows a single point for managing repository settings like access control, it also creates a single point of failure. What happens when the SVN repository is not available because of a machine crash? Well, you can no longer commit any of your changes, you can still do changes on your checked out working copy but you will not be able to push your changes to the central repository. Because of this, you may end up in some undesirable scenarios like
if you want to commit some of your work which is finished, you can’t do that. You have to wait for the SVN server to come back up
you are also now unable to view some past revisions of any files that you might want to see as part of your work
finally, there is a risk of the SVN servers disk getting corrupted and the entire repository being lost since there is only one copy of the full repository. in this case, you do have the files in your checked out working copy but no ancestry information
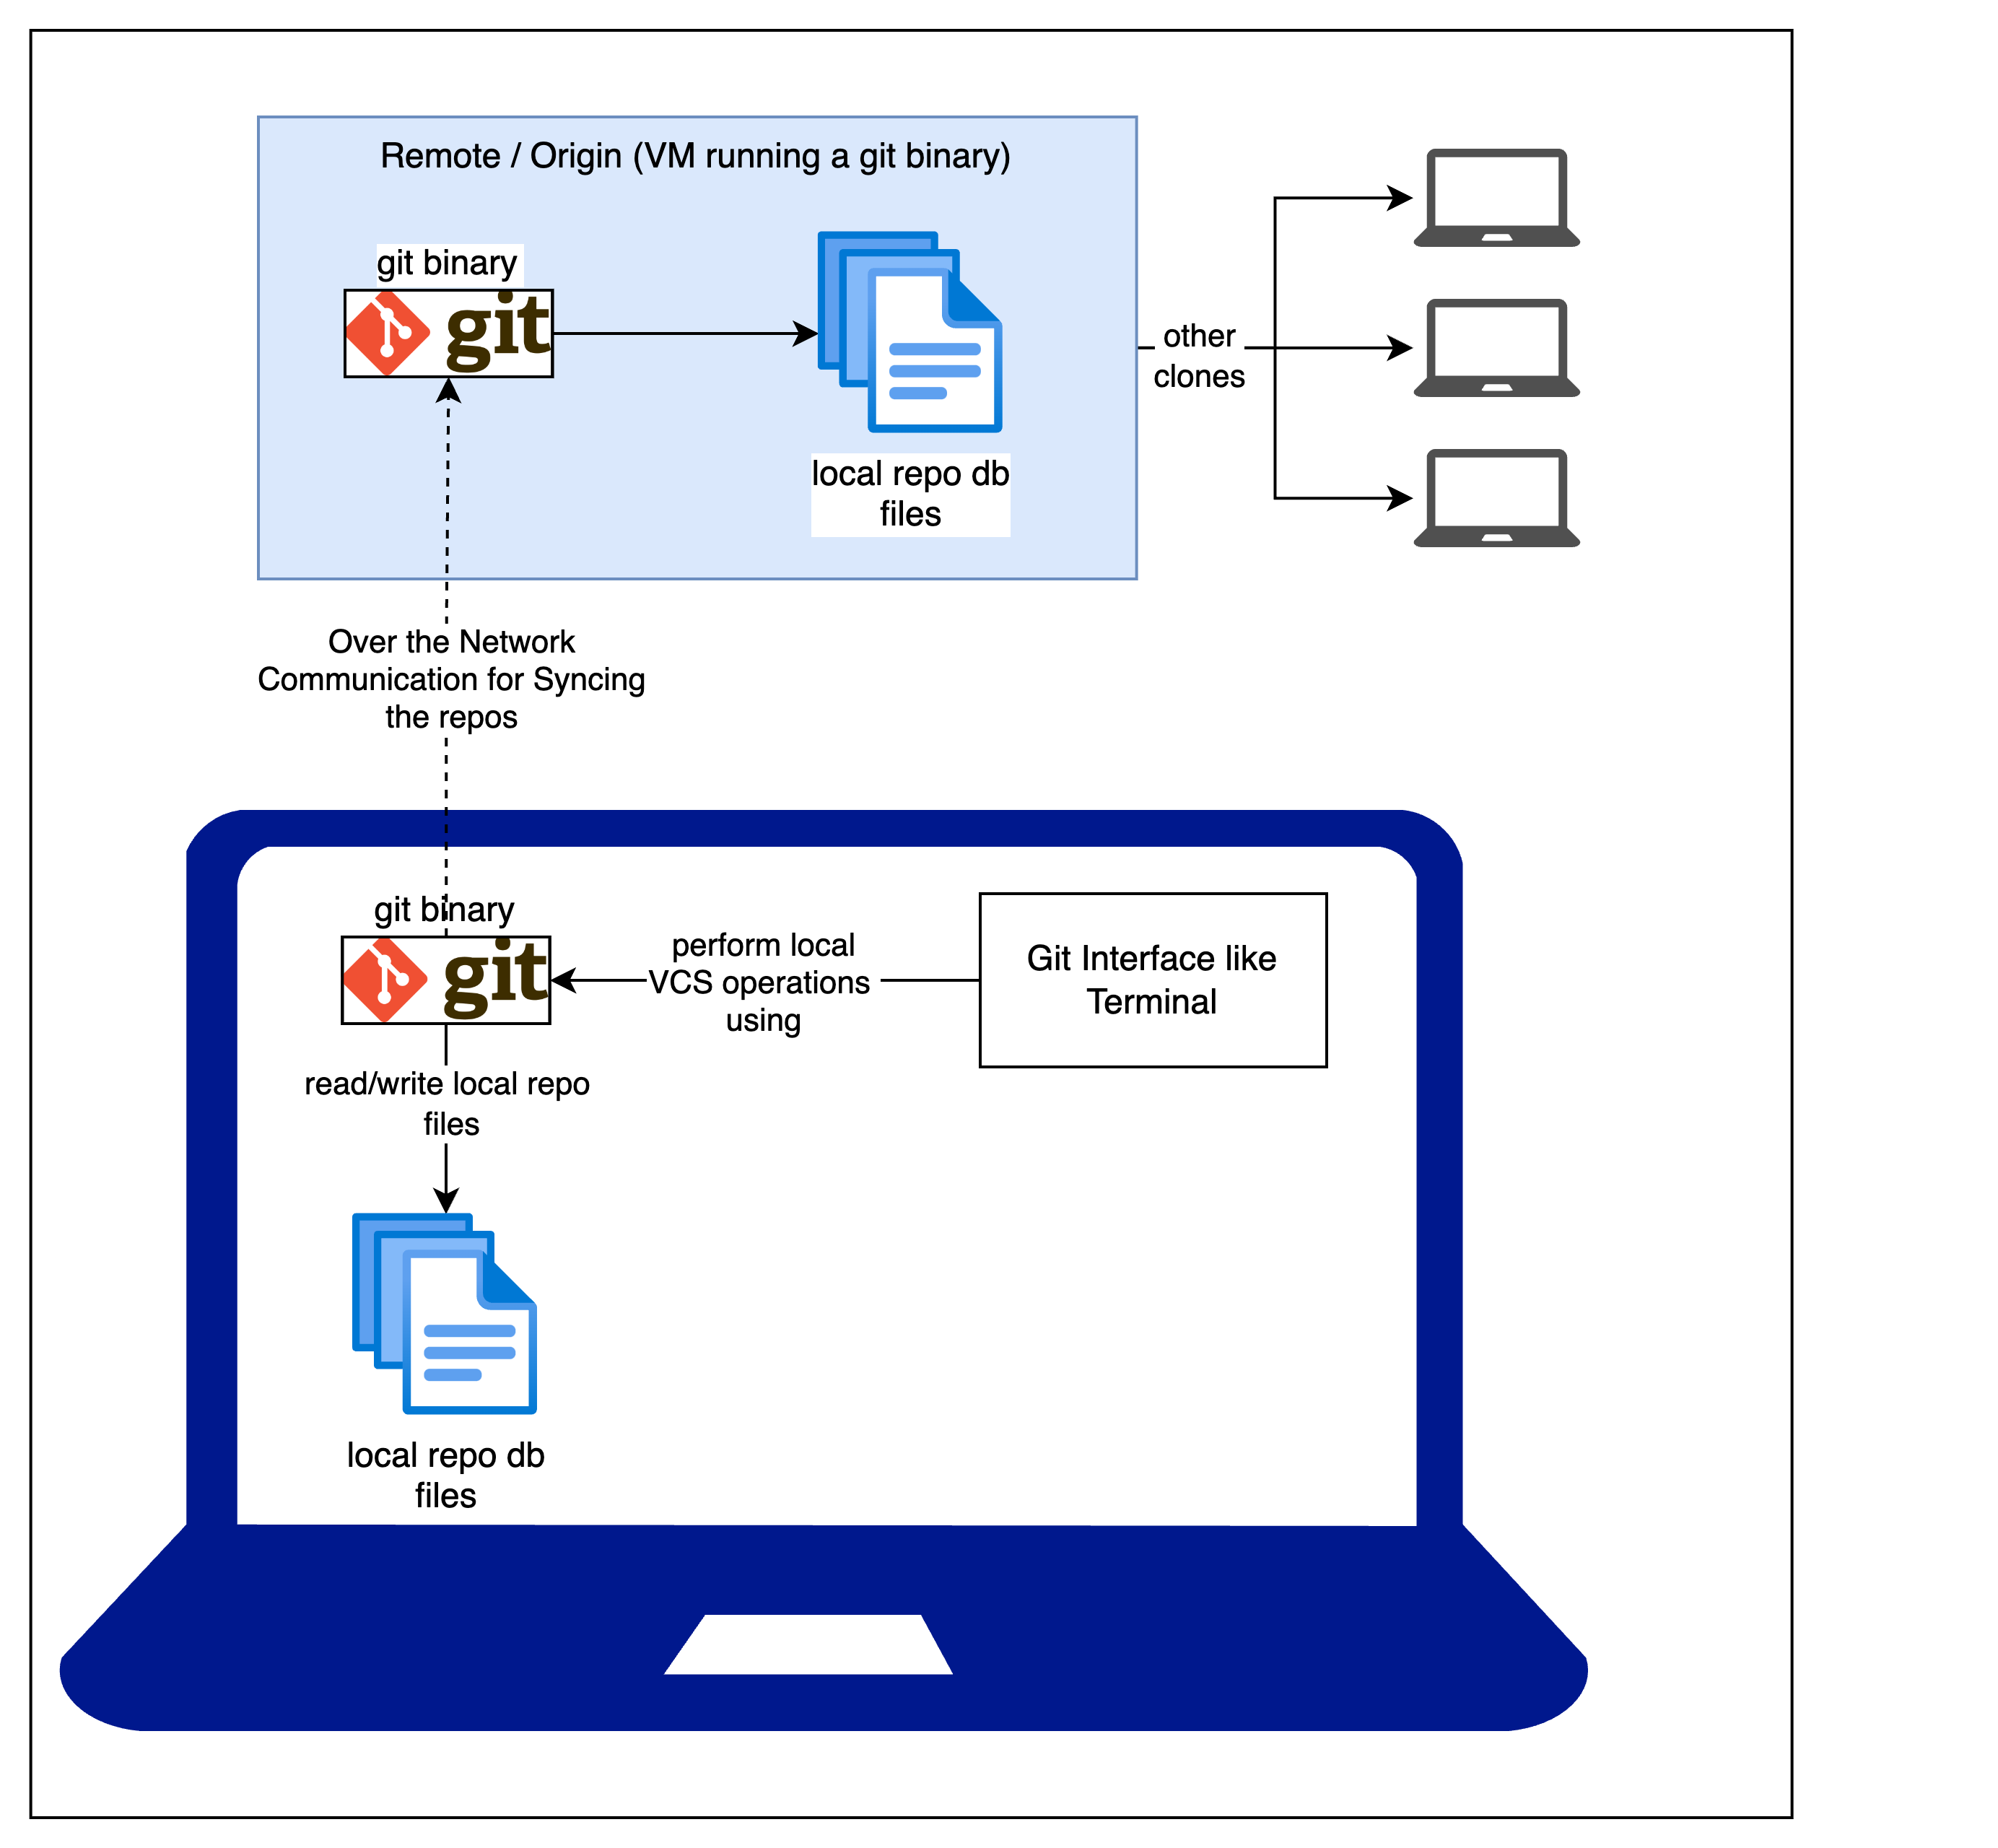
This is where a distributed VCS (henceforth referred as D-VCS) can shine. With a D-VCS, when you checkout a repository, you don’t just get the files of the repository, you get a full snapshot of the repo including the history, branches, deltas, tags and what not. On top of this, a D-VCS applications binary will generally be present on your own machine as well, in simple words, your machine is also a VCS server. What this means is that your local VCS binary can work on top of this cloned repo and provide you the full set of VCS capabilities like switching branches, committing, tagging etc without having network access to the original source where you cloned the repo from.
In a nutshell, with a D-VCS, every person working on a repository will have
their own fully functional VCS setup which can work in an offline mode
access to the repository history, branches, tags etc
ability to go forwards/backwards in your local repository without being online,
ability to create branches, commit code, create tags
push to remote once you are online
Typical Git Workflow
This section will introduce the common git jargon followed by the standard operating model of git.
Common Git Jargon (skip if you are a regular user)
Repository - A git version controlled project containing source files, ancestry, branches, tags etc.
Branch - A branch is an isolated line of development in a project. It contains a history of changes made to the branch and generally represents the changes being done overtime to meet a particular goal like a feature
Commit - Once you have finalised some changes and you save these changes to your repository, the action of saving is called committing. A commit command, creates a commit which generally encapsulates the changes being saved along with some meta information about the author, the commit message etc.
Remote / Origin - A remote repository hosted on a server that can be used as the source from where you can create your own working clone
Working Tree - The working directory which contains the project files and your unsaved changes. The working directory generally gets its files from a branch / tag and then you can make your own changes on top of these files.
Index / Staging Area - Once you are done with the changes in your working tree, you may want to select some of the changes and commit them into your repo. The selected files are added to what is called the index/staging area from where you can then commit them.
Journey of committing a change to Git
Set up your local repository
The first step of your process will be to have a local git repository to work on. There are a couple of possibilities here
You can initialise an empty repo or an existing project as a git repo using git init
You can clone an existing git repo from a remote using git clone
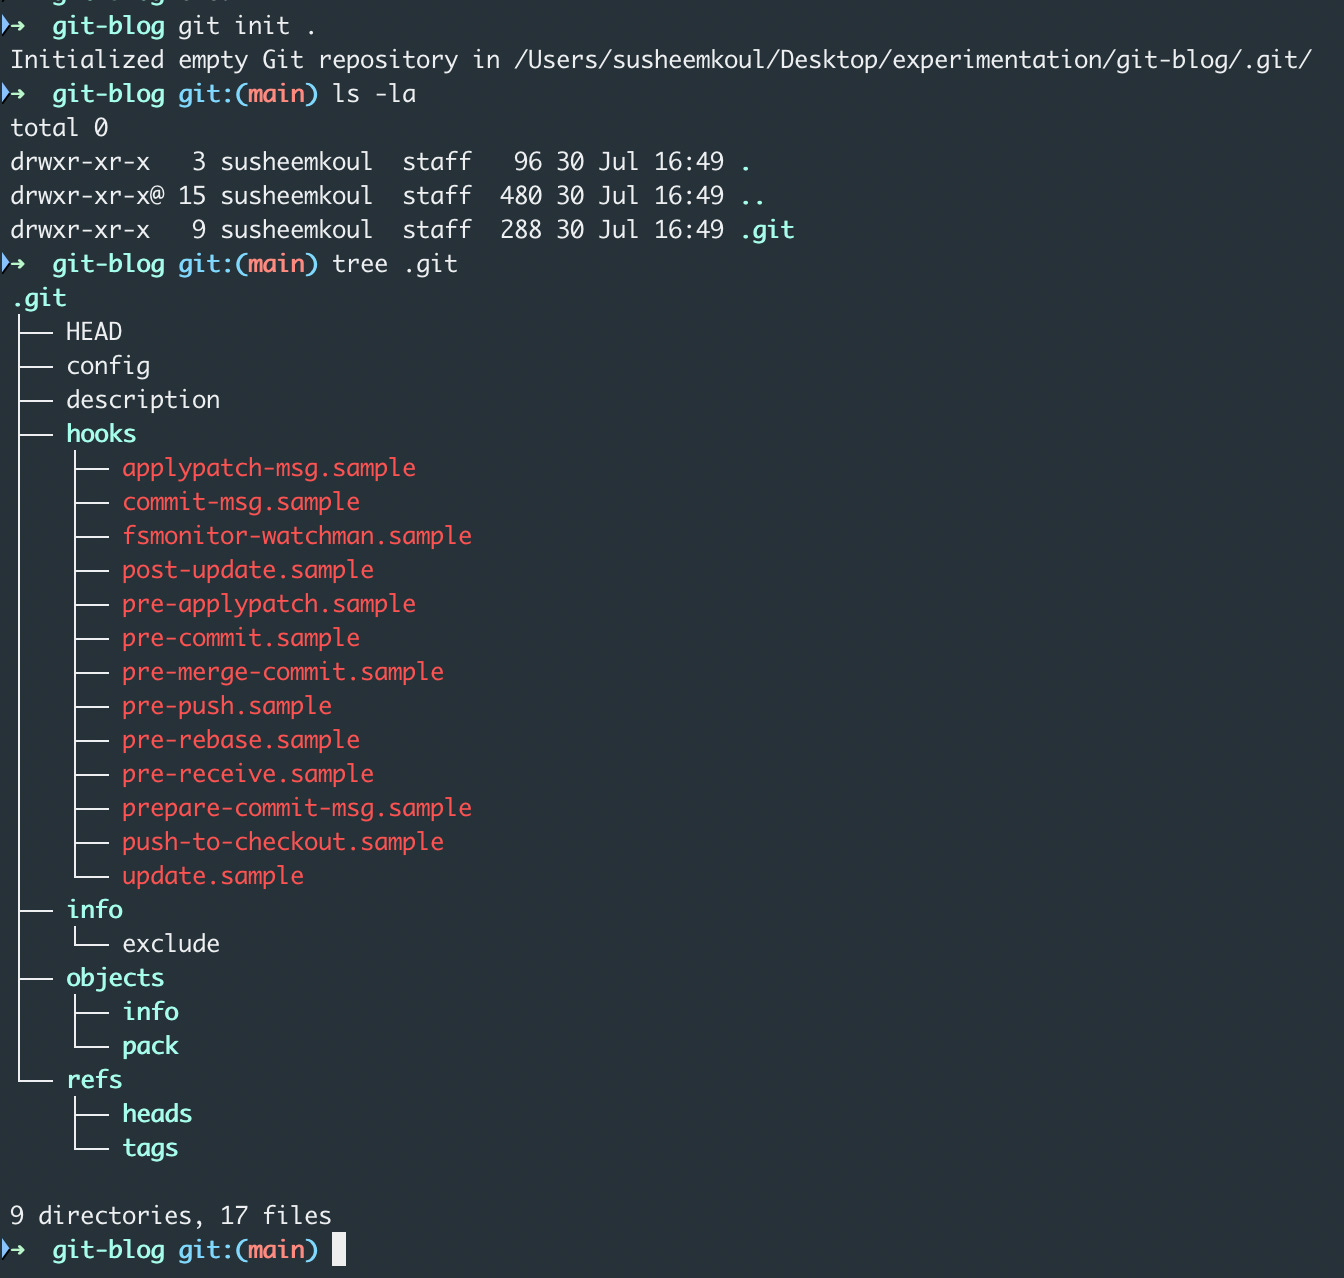
In either case, you will end up with a project folder which is a git managed repository. Git will internally create a .git folder in your project folder.
The .git folder will be responsible for storing the repository data including the files, commits, branches etc.
In our case, here is what happens when we init an empty git repo. I’ve also shown the directory tree for the .git folder although this will make much more sense in some of the upcoming articles.
Switch to the correct branch
Now you have a local git tracked project. Before you start adding/modifying the files, we need to be on a branch that we actually want to push our changes on
By default you’ll be on the main/master branch which is conventionally the default branch in git
You may choose to switch to a different branch using git checkout <-b> <branch-name> . The -b flag is optional and will create a new branch if it doesn’t exist.
Let’s setup a new branch to work on

Do your changes
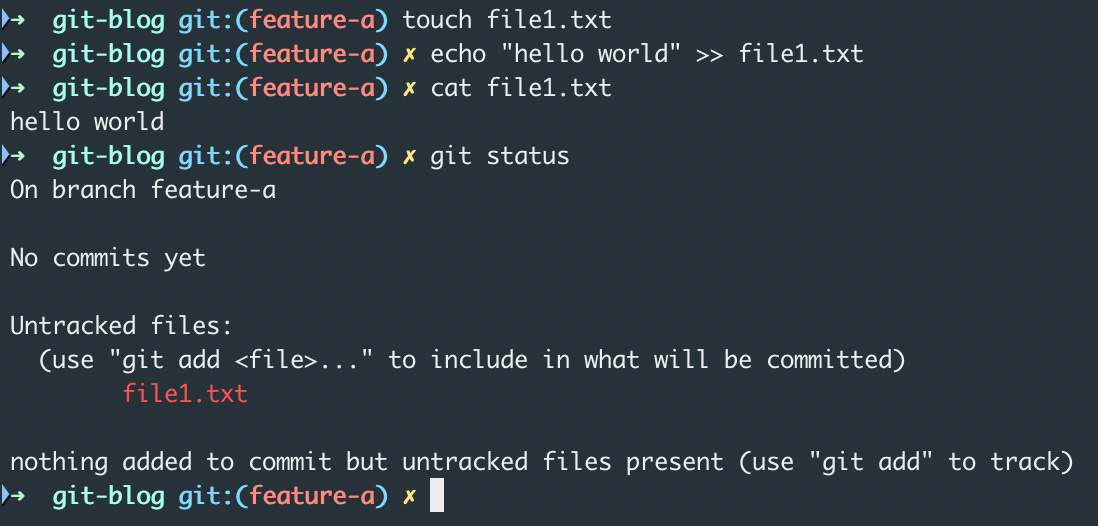
Now that you are on your target branch, you can use your favourite IDE to do changes to the files
These changes are being done in the working tree and won’t be saved to git automatically
you can use the command git status to see the modified files that are not yet staged to the staging area
Stage your changes
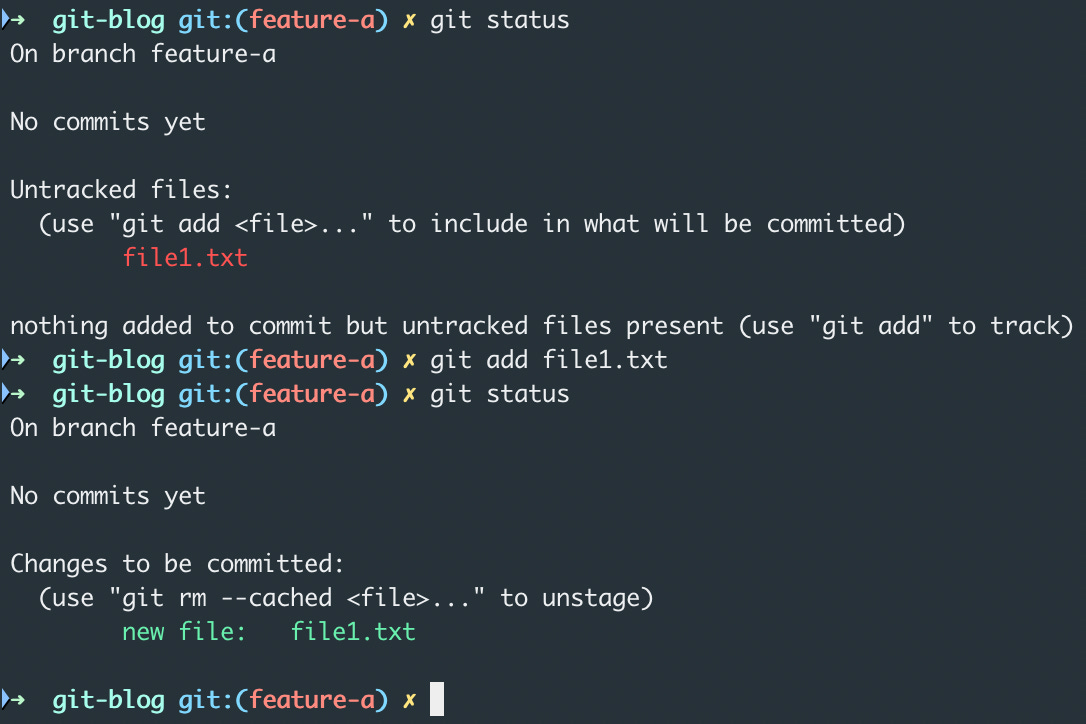
Once you have done the changes, you can now select the files that are ready to be saved to git
You can use the git add <files> command to do this. If you want to add all the files to the staging area, just use git add .
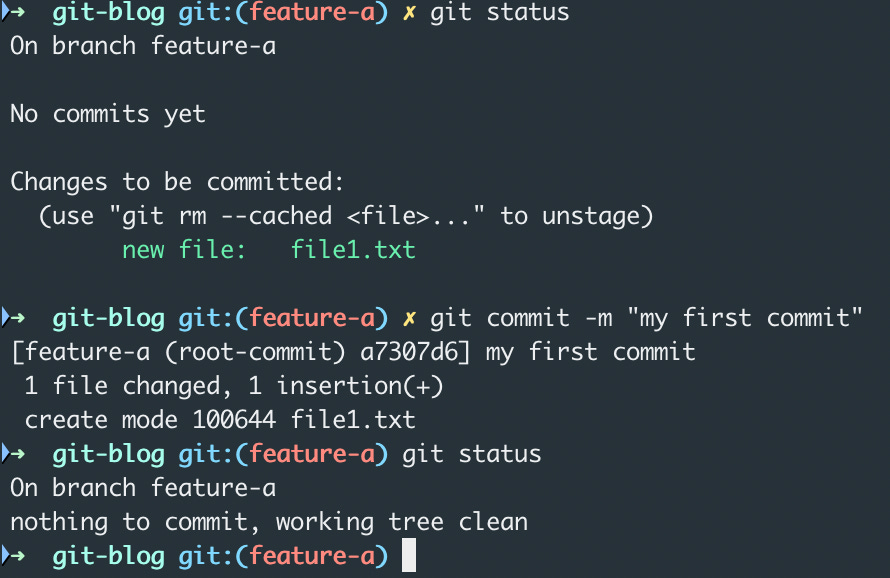
Commit your changes
Now you are ready to check-in your changes to the local git repository.
You can use the git commit -m <commit-message> command to commit your changes to your local repository
The commit will clear out your staging area and push all those files to your local repository. Note that this doesn’t affect the un-staged files in the working tree
Push your changes
Now that your changes have been committed to your local repository, you may want to sync them to a remote/origin. After all that is where the distributed nature of git comes in to picture
To push to your remote repository, you can simply do git push origin <branch>
This command will take your local branch’s commit history and try to apply it on top of the remote branch. In case there are conflicts due to the remote branch being ahead of your local branch, you may need to run git pull origin <branch> to pull in the extra commits from the remote to your local
If the extra changes in the remote are in the same files as your local changes, you may also need to resolve conflicts. git will tell you which files have conflicts and will allow you to resolve these conflicts before applying the changes from remote to your local repository
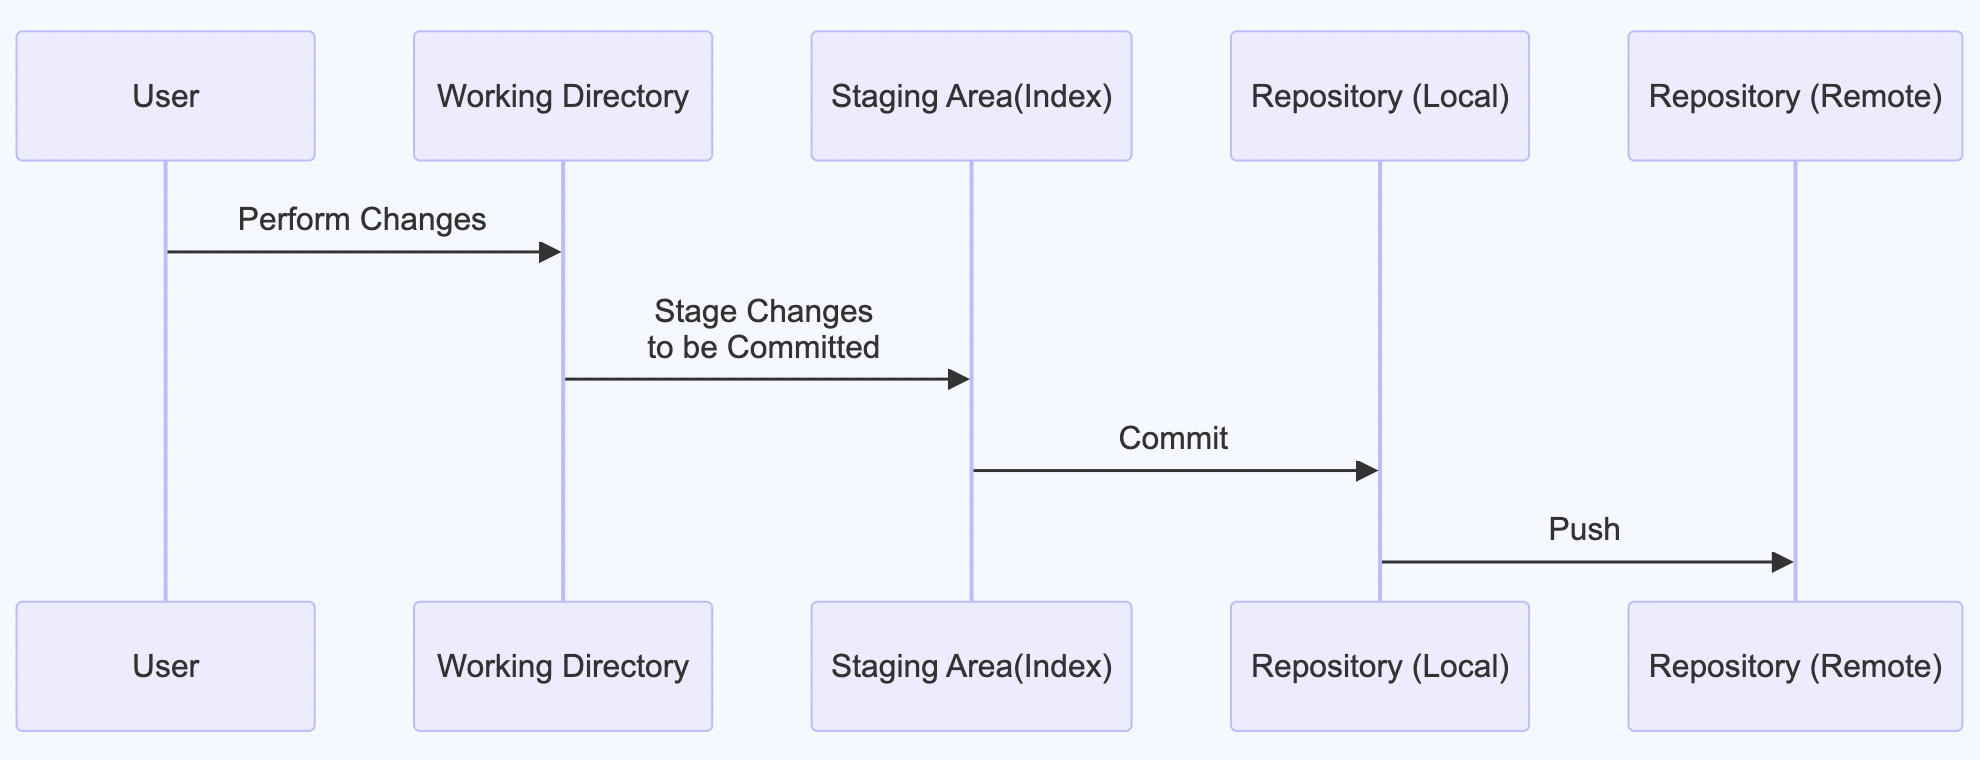
With these steps, you have successfully setup a git repository as well as made your first changes in both local and remote. These steps are often represented in the form of the well-known three stage model of git shown in the diagram below
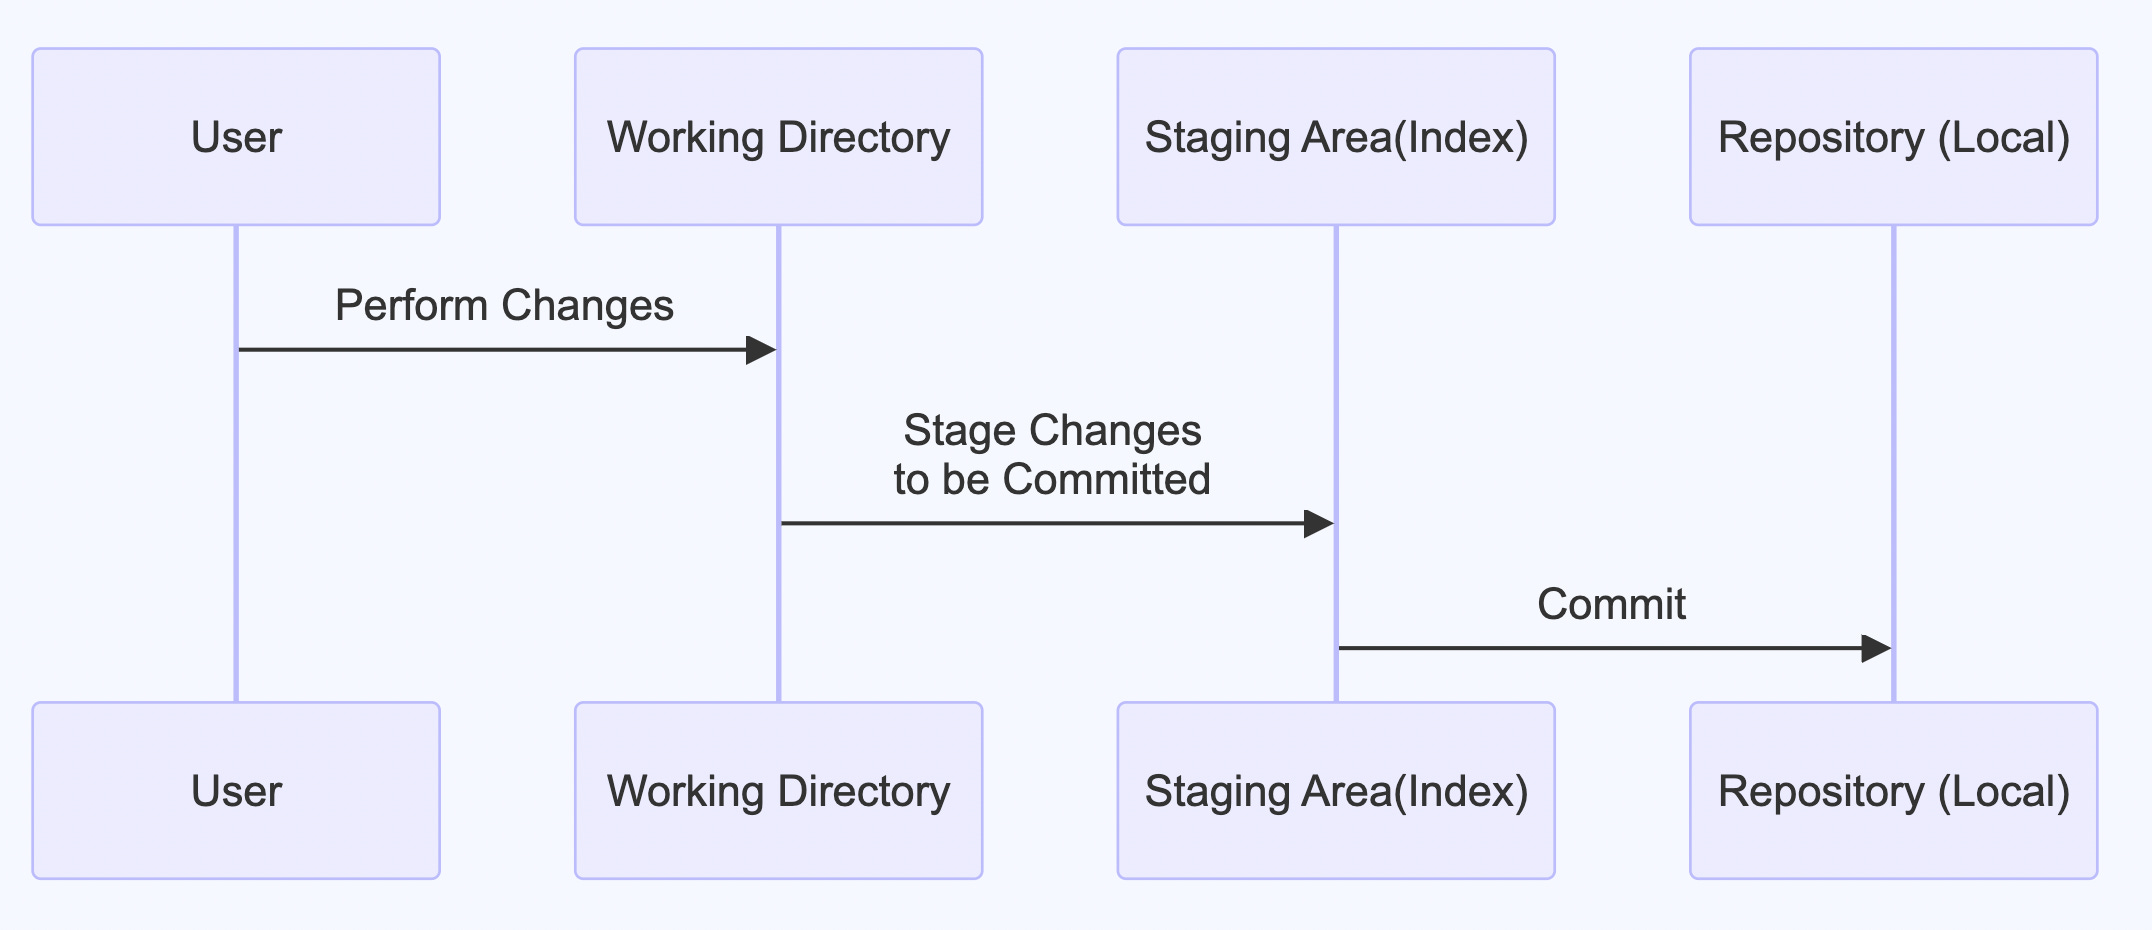
You make your changes in the working directory
You stage these changes to the staging area
You commit the staging area to the git repository (.git directory)
There can be one more step added here that is pushing to remote.
What’s next?
This article was just a beginners introduction to git as a VCS. You can checkout the git commands in reference 5 to tinker around with more of git’s offerings.
The subsequent articles will dive deeper into the kind of data model git uses internally and some of the established patterns for using git as your VCS tool. Stay tuned!